miércoles, 19 de julio de 2017

Arts and Crafts

"Arts and Crafts" sessions have got many benefits for our students, for instance, promote cross-curricular knowledge, involve variety and fun, give a sense of achievement in creating something new and promote teamwork and co-operative learning.


In this section, teachers had the opportunity to learn  many useful verbs, phrases and nouns for doing arts and crafts in their classes. Moreover, teachers rolled their sleeves up, and made a stained glass window with a black card template and some tissue paper. Perhaps inspired by Hove Cathedral?? Thank you teacher Janet for this fantastic activity!!!


What do you need?


- Black card template with a dragonfly.
- Tissue paper.
- A straw.
- Scissors.
- Glue.
- Cello tape.

Instructions:
1. Take your template and choose the tissue papers you like.


2. Then, tear off pieces of the tissue papers you have chosen and stick them on the back of the template. The way you place the pieces of paper is up to you!

3. Finally, attach the straw to the bottom corner of the template using a piece of cello tape.


Poems, rhymes and chants

How do we say words? Indeed, English is a non very intuitive language as far as saying words is concerned. Forget spelling and a have a look at the following poem:


Source: https://s-media-cache-ak0.pinimg.com/originals/12/14/87/121487db49a9fe60920257ca550a2fb8.jpg


Cords are a good tool for arty and crafty works, for example, to make fashionable bracelets. The difficulty of the task can be adapted depending on the level of the students. 1st graders can start with a simple plait, for example. Manipulating cords is also an excellent activity for fine psychomotricity:


Source: http://pulserasdehilo.net/tag/trenzado/

martes, 18 de julio de 2017

Poems, rhymes and tongue twisters

Poems, rhymes and tongue twisters are great resources for teachers. Students can memorize vocabulary, learn grammatical aspects without realizing it and also practise intonation and pronunciation. It was an amazing lesson in which teachers were able to learn more about English literature and act some funny tongue twisters and action songs:

What about making a proper cup with proper clay for Father's Day? Have a look at this one. I am sure 6th graders would love to do it. You can colour it or not. Easy and funny!!


funnyfacemugs

Hove

Hove is a town on the south coast of England, immediately to the west of its larger neighbour Brighton, with which it forms the unitary authority Brighton and Hove. It forms a single conurbation with Brighton and some smaller towns and villages running along the coast. As part of local government reform, Brighton and Hove were merged, to form the borough of Brighton and Hove in 1997. In 2000, the new borough officially attained city status.


One of the most picturesque places to visit in Hove are the colorful beach houses located along the seafront:
What about making a colourful city with milk cartons? It would be nice for 2nd or 3rd grade. Teachers would make it in groups, promoting teamwork and co-operative learning.

Create a milk carton city

What you need:
  • Empty milk or juice cartons
  • Contact paper
  • Double-sided tape
  • Stapler
  • White drawing paper
  • Pen
  • Scissors
What next?
Rinse out your cartons and allow to dry. Open up the top of the carton to make it easier to cover in contact. Cut your contact to size and cover all outside areas. Fold the tops back together and staple where the two tops join together to form a 'roof'.
Use a black marker to draw windows, doors and roof tiling onto the white paper. Cut out, arrange and tape to your coloured cartons.
Set up alongside each other on a craft table or play area. Students can now use their own toy cars, dolls or whatever else they have to create their city.

lunes, 17 de julio de 2017

Arundel

Arundel is a town located in West Sussex and it lies 30 Km of the city of Brighton. Arundel has an amazing medieval castle and a Roman Catholic cathedral which are worth visiting. The river Arun runs through the eastern side of the town.


Let's try a defence castle for 2nd grade!


Materials and tools:

- At least four empty toilet paper rolls.
- A recycled cardboard box.
- Scissors.
- Pencil.
- Ruler.
- Card paper.
- Wooden sticks.
- Colored markers.
Instructions:
1. Start with the toilet paper roll. Draw with a pencil a line around the roll near the top edge, as shown in the image below. 

2. With the scissors make slits around the roll, from the edge to the guide line. 

3. Open the flaps alternately out.


4. Make in total four round towers with battlements.


5. Make four walls with battlements using some pieces of cardboard.
6. Assemble and glue the round towers and the walls together and glue them onto a base.


7.  The castle should loo like this. 
Source: http://www.craftsboom.com/2014/11/defence-castle.html

martes, 11 de julio de 2017

Exhibitions at that time

Brighton is a cultural city too where you can visit some museums, go to the theatre and, depending on the season, attend some good art exhibitions. At the time being, we had the chance to visit a nice display about the great and successful 19th English writer Jane Austen: "Jane Austen by the Sea".
To mark the bicentenary of her death, this display at the Royal Pavilion explored Austen’s relationship with Brighton and other coastal towns. Some of the highlights of the display included some of her manuscripts, examples of Regency costume and accessories, one of Jane Austen’s music books, a cute handmade fan and a mourning brooch containing a lock  of Jane Austen's hair.
What about making an easy fan with the youngest students?
Materials:

  • Paper
  • Blow Pens
  • Popsicle Sticks
  • Scissors
  • Glue Drops
  • Double sided tape (optional)


Seven Sisters


Situated in the South Downs National Park, the Seven Sisters Country Park is made up of 280 hectares of chalk cliffs, meandering river valley and open chalk grassland. It is an amazing Park with wonderful views that will take your breath away!!! If you take a bus in Brighton, it will take you around an hour approximately to get there.


Chalk cliffs can take us towards Valentine's Day, for instance, designing a "Chalk Heart Collage" for 1st course at Primary level.

Materials for Heart Collage

  • Black construction paper
  • Colored chalk
  • Cotton balls
  • Thick paper like card stock or file folders to make the heart stencil. You can even used old pieces of cardboard from cereal boxes!
colored chalk

Directions for Making the Heart Collage

1. Draw a heart shape on your thick paper and cut it out. This will be your stencil for tracing.
2. Place your heart stencil on the black paper. Outline it with a piece of colored chalk.
 
Crafts for Kids: Chalk Stencil Heart Collage
 
3. Still holding the stencil in place, use a cotton ball to brush the chalk away from the stencil. Do this all the way around the heart stencil.
 
Crafts for Kids: Chalk Stencil Heart Collage
 
4. Remove the stencil to reveal your heart!
 
Crafts for Kids: Chalk Stencil Heart Collage
 
5. Continue making hearts using different colored chalk to create your collage.
 
Crafts for Kids: Chalk Stencil Heart Collage from Buggy and Buddy 


Phonetics: Rhythm and Stress

During this course, we had some lessons focusing on Phonetics too. It is well known that English stress and rhythm are not easy tasks for Spanish speakers. We had our chance with the song "Brighton in the Rain", by Jonathan Dykes and Robert Campbell. This a very popular song which is very often used to practise the Present Perfect tense, but we did our best to say it with a proper English intonation.


https://englishvillage.eu/2013/05/17/brighton-in-the-rain-lve-never-been-to-athens-present-perfect-experience/
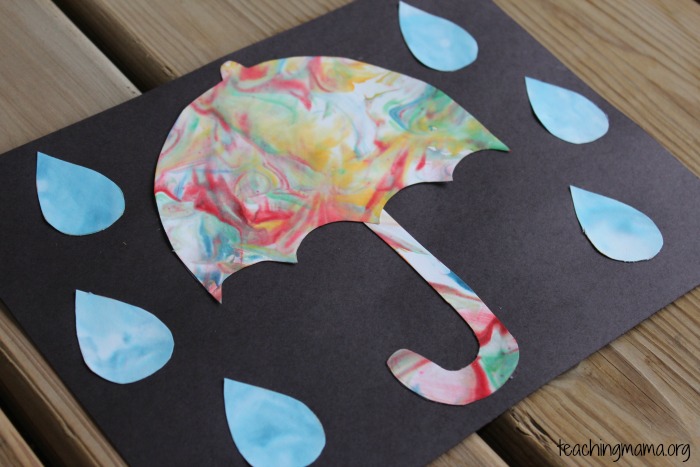
It would be lovely to make an umbrella for a rainy day. Let's try this activity with 5th or 6th grade students;
Here’s what you need:
  • shaving cream
  • food coloring
  • baking sheet
  • butter knife
  • card stock paper
  • scissors
  • glue
  • black paper
  • umbrella template
It’s super simple to create this swirled look. To start, spray shaving cream onto a baking sheet. Then drop food coloring around the sheet. Swirl around using a butter knife (or something similar).
Next, place a piece of card stock paper on top of the shaving cream and press down until the whole paper is coated. Then pull it off the shaving cream and let it sit for a few minutes.
After about 30 minutes, the paper will be dry and ready to make into an umbrella!


You can make the umbrella however you’d like. You can use an umbrella template (click here). Print the umbrella template, cut it out, and trace it onto the shaving cream paper. After tracing, cut out the umbrella and glue it onto a black piece of paper. Cut out raindrops from the blue shaving cream paper. You do not need to use a template with the raindrops.


Source: https://teachingmama.org/rainy-day-umbrella-craft/

The Library


University of Sussex Library is a "cosy" place where students can go to read, study or chat. There are hundreds of books and resources that will make teachers' lives much more easier.

Let's try a foldable to keep information organized. It is easy and can be used in any subject: Maths, English, Natural Science...
First, you will need three different pieces of paper for each student. Copy paper works best, but construction paper will also do the job.

Next, line up the papers so that they overlap, with a small “tab” left for each color.
Then fold the paper over so that you get six tabs in all, and staple the top to make it into a book.  Hopefully you get the idea!
Now it is time to label the cover and the tabs. This foldable is being used for representing the number 100, so the front cover is labelled “Representing 100” and each tab is labeled with a different way that the number will be represented. Representations in words, base 10 blocks, money, equations and pictures are included in this specific foldable. Story problems are also a good one to add.
Now students can write/draw on each page. For example, on the equation page students should write as many equations as they can that equal 100.
This foldable is great for consolidating learning at the end of a unit, and also as a form of summative assessment. They look great in student portfolios and also can make a nice bulletin board display.


Source: http://shelleygrayteaching.com/how-tomake-foldables/

The Lanes

The Lanes are a collection of narrow lanes in the city famous for their small shops and narrow alleyways. If you are brave enough, you can buy an original pair of shoes and a glittering and floral bag. The houses are brightly-coloured, and there are flowers and plants everywhere.


Mother's Day would be a perfect day to make an astonishing bag for mums. Spur your students on to try it!!!


Step 1: Fold up the cardboard as in the picture bellow

Step 2:  draw a nice bag with a nice handle. You can use a rubber if you make a mistake. 
Step 3: Cut with the scissors and fold down as in the picture.
Step 4: Decorate the bag as you like.
Step 5: Don't forget to write down a lovely message for mum.

Stony beach

Believe it or not, Brighton beach has not sand: it has stones instead!! One of the most curious fact about these stones is that they've got small holes on their surface. Look at this picture and try to find them!


Using small stones in an Arts and Craft session is quite common in our classrooms. Here you can find some ideas to be adapted depending on the level of your students.


Steps:
1. Clean the stones. You must first clean the stones. Wash them best. It may remain no earth or other type of pollution on it. The smooth surface is the most important prerequisite for good results.
2. Select the matching colours.
3. You can paint the stones with oil or acrylic paints. You can use the clear nail polish at least for the top layer.


Brighton and the seagulls

Brighton is a town located in the Southern area of England. It is a nice city with a long beach and a historical pier which is worth visiting. If the weather is lovely, people sit on the beach to do barbeques and to enjoy the sun. Be careful with the seagulls because they are always starving and they can ruin your lunch!!!


Let's make a seagull with our students. It's so easy and perfect for a beach themed preschool lesson.


Here's a quick step-by-step photo tutorial!


Take a plain white paper plate. Draw a head shape at the top of the plate with pencil or crayon.


Next, cut around the head but leave it connected at the bottom (as shown above.)


Then, fold down the wings! It's starting to look like a seagull, isn't it?


The last step is just adding detail.  Add little feet, a beak and eyes. If you have silver glitter, it looks great on the wings, too!

Source: http://www.localfunforkids.com/home/preschool-summer-bird-craft-paper-plate-seagull.html